Lens Flare

– Posted in: Garden Photography

At one point or another all garden photographers will have to deal with lens flare.   Too much strong directional light will cause the glass in the lens to disperse the light – flare, and affect the quality of the image.

lens flare in garden photo

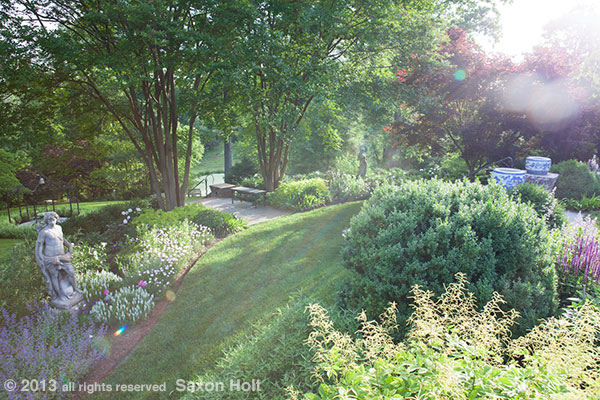
The flare will wash out color and reduce contrast.  It is not always so obvious as in this example, where I was very consciously playing with the sunlight to see how far I could push my lens.  I was previsualizing a glorious sunrise moment and trying every trick I could think of.  More at the end of the post.

The best defense against lens flare is a lens hood that is fitted for your lens.  Or in the case of this photo, simply cupping your free hand (you are using a tripod, aren’t you ?) over the top of the lens will perform a bit of magic.

morning light in garden

A fitted hood is a snoot for the lens that will be exactly the right size for the len’s focal length and prevent unwanted light from entering the camera.  It is a very good idea to use one at all times because most of the time the affect of flare is subtle.  It is an issue in almost any landscape photo that has any sky in it.

Don’t be fooled by advice to garden photographers to shoot in soft light and thus think overcast days or shady locations don’t have flare problem.  Soft light is worse for flare than strong sunlight because it is not so obvious.

With strong sunlight it is often obvious when light streaks into a lens, but with soft light lens flare you won’t know you had a problem until you review the images later.

Flare is one reason why we don’t see a lot of published garden photos that use sky.  Soft, bright sky is great for tonal range in a garden, but creates more havoc on the lens surface than blue sky.  And flare is behind the old adage for amateur photographers to put the light over your shoulder and look away from it when you point your camera at the subject.

Not only is it hard for the camera to pick up the dynamic range between bright sky and shadow details, the strong light bounces around the glass inside a lens and washes out contrast, even in the best coated lenses.

lens flare comparison photo

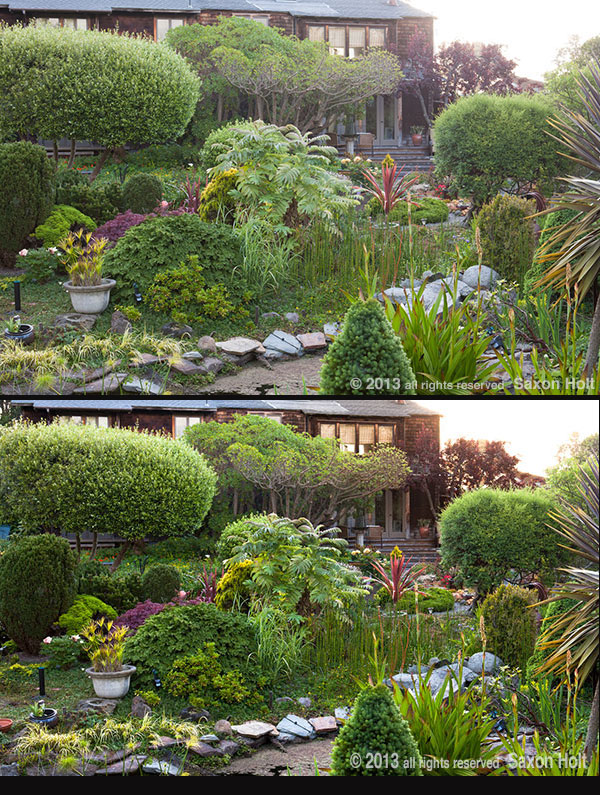
In the above example, in Sally Roberson’s magical garden in Bolinas, even a small piece of bright morning sky causes problems.  Again, my solution is my hand cupped just out of view above the lens.  Note the much improved contrast in the house shingles and the much improved greens in the plants.

(I should note here that Sally Robertson is a phenomenal artist and amazing gardener.  See her work here.  Thank you Sally for allowing me to work in your own outdoor studio.)

I don’t use lens hoods because I change lenses a lot during a shoot, and when the light is critical I am working really fast and don’t have time to fuss with hoods.  Besides, there is no room for all the different ones I would need in my camera vest.

In recent years I have been playing a lot more with light, especially strong light; looking toward the sun to see what happens.  I really like the effect of back light in garden photography and lens flare comes with the territory.

holt_683_1355.CR2

It turns out looking into the sun you can sometimes get the starburst effect and flare is not as much a problem as one would think.  I guess this is due to the strong pinpoint light coming directly into the lens instead of obliquely scattered by the glass.

sunburst light in garden photo

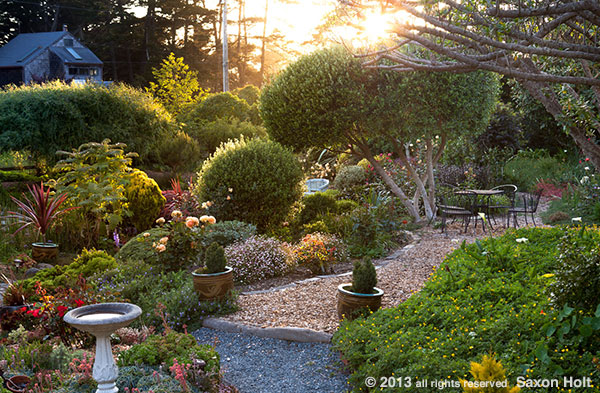
There is a lot of post production computer time spent in bringing out the effect but for the right photo, the time is well spent.  Flare can actually become an asset for revealing light.

In the e-book I will go into step by step detail of how this photo was “altered” to bring out what I wanted to see.  I will say, the most important tool is the adjustment brush in Photoshop that allows you to selectively change areas of the photo in both density and color temperature.  Note, for example, the house across the street is darker and more blue.

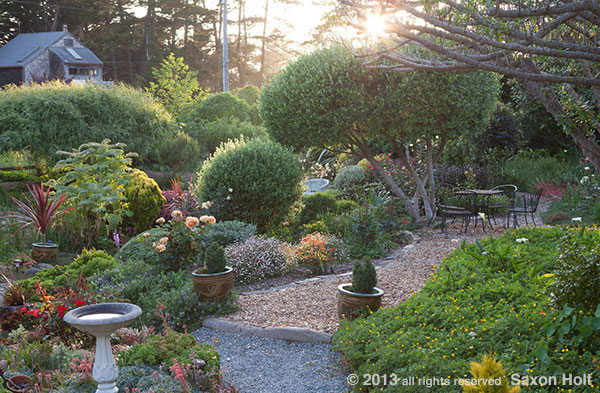
Remember that first garden where I was previsualizing an early morning garden filled with light?  Two minutes after I took that first photo, I was moving fast, quickly looking for an angle to use the sun to best affect.

This is what I found, looking right into the sun.  Flare where I want it.

garden filled with morning light

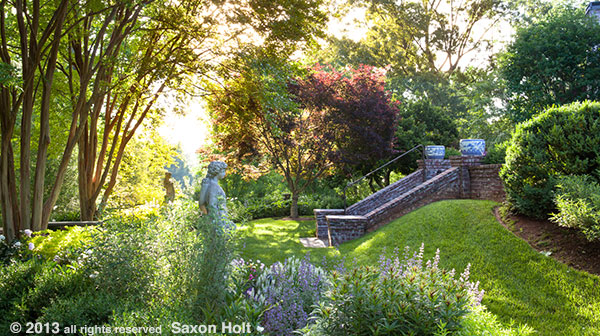
Ahhh the light, the light ….

Saxon Holt
Saxon Holt is the owner of PhotoBotanic.com, a garden picture resource for photographs, on-line workshops, and garden photography stories. An award winning photojournalist and Fellow of The Garden Writers Association with more than 25 garden books, he lives and gardens in Northern California. PhotoBotanic - Garden Photography online at www.photobotanic.com. https://photobotanic.com
Saxon Holt

Latest posts by Saxon Holt (see all)

15 comments… add one

Leave a Comment

Christina Salwitz June 10, 2013, 10:00 pm

I am enjoying these lessons IMMENSELY and learning so much. Thank you!!

Thanks Christina – Getting the feedback is helping me keep this project going. – Saxon

Karen Chapman June 10, 2013, 10:07 pm

I am impatiently waiting for the book!

I use a G10 so a lens hood isn’t an option sadly. Yes I do use a tripod a lot of the time but for big landscape shots I am often frustrated that they limit me as to the exact height I can shoot from.

Quick question 1- is there a way to actually get the starburst effect deliberately, such as shining through a leafy canopy?

Quick plea 1! – in your book I would love you to give tips using the tools in Lightroom, not just PhotoShop.

Thanks Karen – I too am impatient with this whole e-book development process… ANY camera, even a smartphone, can benefit from the lens hood effect. As I said, I don’t use hoods myself, but cup my hand over the lens, much the way one would put your hand in a salute over your eyebrow to reduce squinting. Hard to do if not using a tripod though.
I will most certainly go into features that help your post production but I technically don’t use Lightroom or PhotoShop, but rather Bridge for most of my post production. True, Bridge is part of PhotoShop, but is an Adobe product and very much like Lightroom in its adjustment features.
The starburst effect is in fact created by the foliage breaking up the light. – Saxon

ks June 10, 2013, 10:30 pm

This is a great lesson Saxon..I have a really crappy lens hood (too short , but all that fits my kit lens) and I often forget to pack it with me. I’ve used the hand thing many times. Looking forward to the class during Fling..

I am sorry to report you will be ignored at the Fling owing to being a Dodger fan 😉 – Saxon

Anne Wareham June 11, 2013, 4:39 am

It’s that statue that’s the real problem…..

I know, the darn thing got in the way of my light – Saxon

Anne Wareham June 11, 2013, 4:45 am

O – but/and thanks for these useful pieces. (you wouldn’t believe I’m married to a professional photographer….. but he does it more than tells me about it..)

Thanks Anne – As I write this book I have had to think about this photo process, much of what is intuitive and hard to verbalize. Really, photographers don’t want to explain how it was taken, just hope it works, someone notices and our luck holds out. – Saxon

Jan LeCocq June 11, 2013, 5:46 am

Another great article! Thanks.

THanks Jan – I appreciate the feedback – Saxon

Catherine Bast June 11, 2013, 7:20 am

Dear Saxon:
Thanks so much for this article. I am an artist and many times when photographing flowers with backlighting, I am so disappointed with the photograph as the light has washed out the change in color of the petals.

I will try using my hand as a hood.

Regards – Cathy

Cathy – Backlighting as a conscious source of light for flower photography is wonderful and I will do a whole post on it. Flare is absolutely a problem and you will be amazed how much more detail you will see when you control it. However. For some backlight flower work, the light coming through the petals, washing out detail and color is part of the aesthetic.
By the way, as an artist you will enjoy the link to Sally Robertson, whose garden is featured in the post. She is an amazing flower artist, her garden is her source:http://sallyrobertson.com/ I should have linked it in the post … – Saxon

Donna June 11, 2013, 2:55 pm

This was a great post for all those dealing with lens flare. Like you, I use a cupped hand, but rarely have a tripod along. It takes some getting used to though without all the fumbling. Another thing to mention is using a small, collapsible disc reflector or diffuser for primarily doing closeup work. Allows nice even lighting opposed to the harsh light found when the sun is blaring across a subject. I actually like incorporating flare and do it often. Like you said the starlight effect is nice too like at f22 or above. I said before, most of my photographs are taken during the lousy light of midday. I have found ways around it, but you can’t beat a day that has blue sky, puffy clouds and a softer glow if you have to shoot near midday. The images are awash in vibrant color. I really have been loving your lessons lately. They are a bit more on the practical side, helping myself and many others. Not many pros get into all the things the amateurs might benefit from knowing.

Thanks Donna – I am planning out the section on practical matters for the e-book so my mind is on these pointers. The tip on reflectors and diffusers will certainly be used too. I love your own contributions here – Saxon

Cid Young June 11, 2013, 5:55 pm

Good points, Saxton, and for a greater explanation to your readers, here are some details that you left out.
Lens flare can be seen in the viewfinder before the shot is taken, therefore one can make adjustments, such as changing the angle, using a lens shade/hood (as an accessory, or by physical hand shading). Lens flare is caused by light entering the lens and refracting off each lens element (Most good quality lenses are comprised of many pieces of optical quality glass that moves to focus for distance, etc.) That is why many photographers use a polarizing filter. Polarizing filters change the way that your camera sees and treats light. When using one, you’ll be able to observe a difference in how your camera “sees” reflections and glare. As a result it also has the ability to change the vibrancy of some colors in shots.
Uses include the following conditions:
Water – When shooting a picture of water, adjusting your polarizing filter will mean you see into the water differently, cutting out reflection & glare and even changing the color of the water. Using a polarizing filter will make the reflections on water look more clear and enhance the richness of the colors. Without the filter, shots will not have the same impact as glare off the top of the water will wash out or cause colors to appear murky, not saturated.
Sky – Similarly, the color of sky will change noticeably when a polarizing filter is used. Simply by rotating the filter, you’ll see a blue sky change from a light pale blue color to a vibrant and deep blue color (depending upon where the sun is). A polarizing filter can cut out a lot of the smoggy haze that is often in city shots, or increase the contrast in clouds.
Color – Polarizing filters cut down on the reflections that many objects have, even those that you might not think would reflect at all, thus allowing for better color saturation and vibrancy. For example, when photographing in the garden, you might notice foliage on trees looking greener than you would get without the filter.
Other applications – Shooting through glass can be a real challenge, so using a polarizing filter can definitely cut down the distracting reflections or glare. Similarly, if photographing shiny objects, such as a metallic object, you will observe far less glare and enriched colors.
Do keep in mind, polarizing filters were pioneered by Polaroid, like the sunglasses. Therefore, they do reduce light, so if your camera has automatic exposure, the light meter will adjust automatically if the filter screws directly onto the lens. If using a “point and shoot” style, many light meters are not inside the lens, but above the lens, next to the viewfinder, and therefore you’ll need to manually adjust for the difference in exposure. Because it reduces light, do not use a Polarizing Filter at night, and rarely indoors.

Thanks Cid – Now I won’t need to explain polarizing filters in the book – I will just reference folks back to your explanation. Polarizing filters do not compensate for lens flare however and I don’t want anyone to think it will solve the problem. They have their uses, particularly as you mentioned when dealing with water and blue sky, but have little affect on greenery and foliage. _ Saxon

Cid Young June 11, 2013, 6:01 pm

To the question posed by Karen Chapman, “Quick question 1- is there a way to actually get the starburst effect deliberately, such as shining through a leafy canopy?” the answer is yes, if you purchase a lens accessory known as a Starburst filter. I would not recommend using it on every shot, but use it judiciously for a “special effect” .

Thanks again Cid. You are going to be my filter expert. – Saxon

Dominick Lanting June 12, 2013, 11:10 am

Hi Saxon,

Thanks for the tips. I’ve learned so much from this article. I never thought shooting in soft light can be worse than strong sunlight. I’m not very observant since I’m still learning the wonders of photography. Anyway, thanks for sharing! 🙂

Thanks for dropping by Dominick. The difficulty of soft light as a flare source is because the whole of the sky becomes a light source, like a big studio soft box in the sky. Blue sky, while tough on contrasts at ground level, doesn’t flare (unless of course you look into the sun). In soft light, incorporating even the littlest bit of sky should cause you to look for a fuzzy glare on the image. – Saxon

Aaron June 16, 2013, 12:59 am

Nice tips to avoid picture getting distorted, installing hood sounds to be a great idea.So far I have been using hands while taking pictures to avoid the excess sunlight.

Another advantage of lens hoods over the lens is the protection they offer against bumping the lens. – Saxon

Cathy June 21, 2013, 9:35 am

Saxon, I just wanted to say that I am continuing to enjoy these lessons immensely, and they the most recent ones have been very timely – this one is posted as I have been photo’ing our garden on some very sunny days and yesterday, I was really struggling with the flare. The wash out was exceedingly obvious.

The other lesson that my narcissistic self is certain was written especially for me is your recent post about photoing hard-scape which appeared just as we were starting our annual volunteer stint at the Brooklyn Botanical Garden. Now, we certainly have plenty of our own (hard-scape, that is), but the rose garden (where we volunteer) and the Japanese garden provided so many opportunities for me to practice. I took an embarrassingly large number of shots and I am still trying to decide which ones to include in a post about the lesson in particular and the course in general.

Thanks again for all of the great advice. Improvement can be subtle in the short term but when I look back at the photos I was taking 3-4 years ago and compare them with what I am taking now, all I can say is WOW. What a difference some professional guidance makes!

Cathy

Shirley July 6, 2013, 9:18 am

Finally, the explanation for the effects in some of my photos. I’ll try your tips. Thank you.

Saxon Holt July 10, 2013, 11:27 am

I think you will find that shielding your lens whenever you might shield your eyes will noticeably improve photos

[shareaholic app=”recommendations” id=”13070491″]

1 Shares
Share
Tweet
Pin1
Share