Follow Up On Over The Top Couture Container Gardening

– Posted in: Garden Design

Since there were several queries and comments on my post about the containers at Chanticleer, I mentioned that I would try to contact Dan Benarcik, the horticulturist who is the designer of several of these containers to get his input on the ‘hows’, ‘whats’, etc. I was lucky enough to run into Dan on Saturday at Starbucks where we sat and chatted a bit about how he actually maintains these extravagant creations.
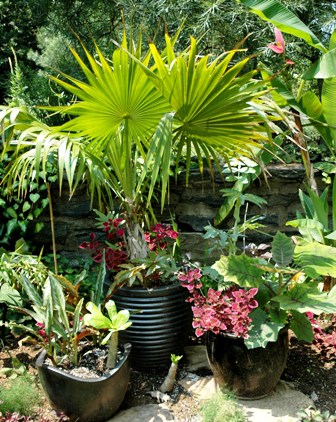
Dan said that he was happy that others seemed to have a better grasp on how he designs and maintains the containers than he does at times. In a very self deprecating tone, he explained that the gardening season at Chanticleer is so intense that once he pots up the containers, it is with the intent that they will last the entire season with no changes. Dan said that he loses about 10% of the plant material throughout the season. It is only then that he replaces a plant. Otherwise, outside of the forced bulbs that can be seen in the containers this week when Chanticleer opens to the public, from mid-spring straight through the fall season, visitors are observing the identical container vignettes: developing from infancy to maturity.

Now, as far as fertilizing the pots, Dan said that he is lucky if his schedule affords him the opportunity of getting to that task about once a month. What product does he use? I forgot to ask. And if you think he’s watering these exuberant plantings two or three times a day, you’re wrong. Once in the morning…and that’s it.

So for those of you who thought that there was alot of primping and fussing in the maintenace of these over the top couture containers, it looks like you need to become acquainted with the world of ‘Container Gardening According to Dan Benarcik’. His is a no nonsense, straightforward approach: along with a great flair for design and a deep love and knowledge of plant material!

Fran Sorin

Fran is the author of the highly-acclaimed book, Digging Deep: Unearthing Your Creative Roots Through Gardening, which Andrew Weil, M.D., recommends as "a profound and inspiring book."  

A graduate of the University of Chicago with Honors in Psychology, she is also a gardening and creativity expert, coach, inspirational speaker, CBS radio news gardening correspondent, and Huffington Post Contributor.

Learn more about Fran and get free resources that will help you improve your life at www.fransorin.com.

Google+ | LinkedIn | Facebook | Twitter | Pinterest  

Fran Sorin
10 comments… add one

Leave a Comment

N. & J. March 30, 2008, 9:18 pm

I guess what I lack is the flair for design and knowledge of plant material but I’m learning more and more each day and the internet and library are endless sources of ideas.

Hey….don’t you go putting yourself down. All of us have alot to learn. And it’s stories like the one about the containers at Chanticleer that inspire and show us that there are ways of achieving a certain look. I think the most important thing for you to do is just to work in the garden and not be afraid of experimenting…..you’ll find out what work, what doesn’t and what you like and don’t like!! fran

Kim March 30, 2008, 10:49 pm

HUH! I wouldn’t have guessed… but that makes me very happy to read. There IS hope for the rest of us! 🙂

Yes Kim…..I know. I wouldn’t have guessed either. It reminds me of the most gorgeous woman in the room who you think has spent hours on dressing, hair and make up and then she tells you that she’s able to look like this in less than 30 minutes. It is inspirational! fran

jodi March 31, 2008, 12:22 am

He’s certainly talented, Fran, and an inspiration to anyone who’s ever wanted to try something a little unique in containers. I love the results, and his attitude, too.

Jodi-
Thanks for chiming in….yes, I agree. His attitude is refreshing. fran

Lisa at Greenbow March 31, 2008, 7:43 am

I believe him when he says he doesn’t water but once per day. I have a couple of palms and they sure don’t need any special treatment. I do need to cover their feet with some of these other plants. It sure makes them look more interesting. These are inspirational plantings.

Kathryn Johnson March 31, 2008, 11:05 am

I am always amazed how people express their creativity. Thanks for the container series.

Kathryn

Kathryn-
With pleasure….yeh, it’s pretty amazing, isn’t it?? fran

Liz March 31, 2008, 3:32 pm

The man is a creative genius. With spring here (after all, tomorrow is April!) it’s interesting to see what other people have done and get ideas and inspiration to decorate and beautify my own little corner of the world. Thanks for the info.

Liz-
Happy April 1st….and yes, spring is here….even though it’s raining in our neck of the woods….I agree that it is wonderful to feel inspired by one who is so creative. And yes, I am a firm believer in ‘working our own plot of land’ and creating beauty wherever we live! Thanks for your input. fran

Kris at Blithewold April 2, 2008, 8:18 am

Huh. He sounds like us (no time for anything high maintenance)! I might have to get over my fear of mixed containers and try something stupendous this year too. I’ll have to try to channel Dan for design inspiration… Thanks for the follow-up.

Kris-
Am going to try to get over to Chanticleer over the next couple of days to photograph the containers as they look now and continue with a progression throughout the season. Yes…..it is nice to know that Dan does not fuss and primp over the containers. Fran

Peter April 13, 2008, 8:12 am

I’ve got to admit I used to think that container gardening was all a bit too much work for an all-thumbs (none of them green) kind of guy like me – but seeing the beautiful examples that others have shared on the internet, and through reading articles like yours, Fran, I believe with a little trial and error even I might be able to create a lush and lively living space. Dan’s work is certainly something to behold.

Peter-
No doubt that you absolutely will be able to do some fantastic containers. Just experiment and have fun. I actually was going to run over to Chanticleer today to take photos of the garden and containers at the very beginning of the season so that all of us could observe the changes throughout the entire growing season. But then I just got too busy in my own garden…and now the day is whooshing by and Chanticleer has closed. But I will try to get over this week to snap some early season photos, including Dan’s containers! thanks for your comments, Peter. Fran

Chris Reid August 13, 2008, 2:20 pm

Regarding how to make containers work (reducing labor), I care for about 19 containers on one large property and a similiar group of smaller pots on a somewhat smaller property.

I am using several techniques to reduce watering: first, gel sheets (they may be a gel type of capillary matting — I purchased retail at Gardeners’ Supply but maybe there is a wholesale version) rather than actual gel) – I think these are very helpful in shallow containers that tended to dry out too quickly in the past. I have been less clear about the benefits of gel.

I also used the GS automatic reservoirs, even using them on slightly larger pots than recommended and I can’t complain about the results. At first I was leery of the bottom -up capillary action watering, but I do feel that pots hold over better with this technique AS LONG AS the top soil doesn’t dry out.

If it does, rewetting can be a challenge. As a wetting agent, I use an ingredient that I first learned about when brewing compost tea — yucca schidigera extract. There are many versions of it — I use the stuff from T&J Enterprises which is food grade and keep it in the basement or refrigerator.

It lasts forever. In a gallon of water probably 1/2 cap is more than enough (careful because it foams up tremendously). This is beneficial to soil organisms and will rewet hydrophobic (dry and water-rejecting) potting mixes.

Lest you think that I am a GS astro-turfer, I have also surfed the interiorscape container suppliers and t hey are into the reservoirs to reduce watering big-time and could represent another source of supplies or ideas. I don’t like plastic containers, but all I can say is the principle is plenty easy to understand and apply to an upscale container, and if you buy an auto watering setup and examine it, making your own custom auto reservoirs should be quite intuitive.

Finally, in terms of irrigation, because commercial potting mixes are formulated to not allow overwatering, if you made a wetting pattern/diagram to show how water moves through that media, it would be pretty vertical (it’s more like the way water moves through sand — in contrast, with clay , the wetting pattern tends to move out laterally before it moves downward). I have been working with Netafim’s greenhouse watering system using what they call arrow drippers — stakes with tubes attached to them. The water drips into the soil and not on the surface, unlike most landscaping emitters. I think it helps prevent rotting leaves in closely planted pots, and allows me to target the most water-sensitive rootballs precisely. I have greatly reduced the time I am charging the client to water pots in a baking Western exposure by working with these drippers. If you are putting all the pots on one zone, there are limits — no more than 55 emitters to a zone, says Dave Sokol of Milikowski’s (greenhouse supplier and the guy who helped me understand how to use these stakes). I have not found that in any way restrictive.

You can get Netafim emitters of 1 gallon, 2 gallon, and 3.2 gallon per hour that hook up to these 2-way 4-way and 4-way stackable “harnesses”, and connect onto the emitters from 2 to 8 drippers. I don’t put less than 1/2 gallon per hour through a line because they don’t handle it all that well, I’m told. That means I would not use more than 4 arrow drippers off of a 2 gallon emitter.

You can also buy the drippers and tubing separately, but my advice is: don’t do it. your labor is likely far more costly than buying pre-assembled 4-ways, and there are a variety of length (e.g. 18 inches, 24 inches, 36 inches, 48 inches) and even combos of 2 plus 2 different lengths.

To use in a pot, so far I have been using landscape sod staples to anchor the white tubing around the pot rims, and then angle the drippers inward and stick into the soil when I have reached the rootball of choice. The idea I had was that with the longest possible lengths in a pot, I could re-use the drippers in a future season. If you have a molded pot, the tubing will fit neatly under a rolled inward molded edge.

I have gardenias and large pots with higher gallonage emitters, and somewhat shaded pots that get by on less. I based my setup on how much I had been watering them by hand, since I always used a one-gallon watering can.

I don’t have the system perfected — I do still spot water for dry spots in my pots (I would like to add more emitters and arrow drippers, but require help in working out the hardware details to do so). The fact that I can add extra water on scorcher days just by running the zone a few more minutes is a huge time saver.

I do not miss hauling water around a sunny western exposure property on 96 degree days AT ALL.

What has impressed me about watering bottom up in particular is that I think I was overwatering and ending up with yellowing plants that I attributed to nitrogen deficiency. With the bottom up watering, I think the oxygen levels in the soil are better and the plants don’t have the greenish cast they had in the past.

The surface in those pots does not tend to be as moist as it is in other top watered pots, but the plants are not unhappy.

The only caveat I would add is that as the season progresses and roots fill the containers, the time between watering, which might be days earlier in the season, might be as much as once per day.

When I deconstructed the pots after using the reservoirs last year, i found roots had grown through the perforated grid on top of the reservoir (looks kind of like a vegetable steamer) and were hanging into the water itself.

Chris-
Thanks so much for all of the useful information you are sharing with us on how to minimize watering pots. I have never tried the gel sheets (have seen them advertised before) and will now go ahead and order next year. Will also need to check out arrow drippers. Whew!! You have given all of us alot to think about when we assemble our container gardens in the future. Your input is greatly appreciated. Fran

Chris Reid August 13, 2008, 2:26 pm

Correction: I should have said that the plants I may have overwatered had a yellowish green cast… color improved greatly with bottom watering.

When you bottom water (using the system I used), you uncap and fill a tube to the reservoir at the surface with water until a straw with closed cell foam on it pops up to indicate your reservoir is filled. If top soil is dry, rewet it to keep capillary action going. I add extra perlite to my potting mix to keep soil from being too heavy and wet.

[shareaholic app=”recommendations” id=”13070491″]

2 Shares
Share
Tweet
Pin2
Share